lunes, 14 de octubre de 2019

Filas en columnas (Pivot Table)

Un excelente artículo de como realizar referencias cruzadas, pivota tabla o filas a columnas, como quieran llamarle.


Publicación realizada por MaryAnn Xue del 1 Noviembre del 2018
Articulo tomado de: https://databricks.com/


SQL Pivot: Converting Rows to Columns

Pivot was first introduced in Apache Spark 1.6 as a new DataFrame feature that allows users to rotate a table-valued expression by turning the unique values from one column into individual columns.
The Apache Spark 2.4 release extends this powerful functionality of pivoting data to our SQL users as well. In this blog, using temperatures recordings in Seattle, we’ll show how we can use this common SQL Pivot feature to achieve complex data transformations.

Examining Summer Temperatures with Pivot

This summer in Seattle temperatures rose to uncomfortable levels, peaking to high 80s and 90, for nine days in July.
DateTemp (°F)
07-22-201886
07-23-201890
07-24-201891
07-25-201892
07-26-201892
07-27-201888
07-28-201885
07-29-201894
07-30-201889
Suppose we want to explore or examine if there were a historical trend in rising mercury levels. One intuitive way to examine and present these numbers is to have months as the columns and then each year’s monthly average highs in a single row. That way it will be easy to compare the temperatures both horizontally, between adjacent months, and vertically, between different years.
Now that we have support for PIVOT syntax in Spark SQL, we can achieve this with the following SQL query.
SELECT * FROM (
  SELECT year(date) year, month(date) month, temp
  FROM high_temps
  WHERE date BETWEEN DATE '2015-01-01' AND DATE '2018-08-31'
)
PIVOT (
  CAST(avg(temp) AS DECIMAL(4, 1))
  FOR month in (
    1 JAN, 2 FEB, 3 MAR, 4 APR, 5 MAY, 6 JUN,
    7 JUL, 8 AUG, 9 SEP, 10 OCT, 11 NOV, 12 DEC
  )
)
ORDER BY year DESC
The above query will produce a result like:
YEARJANFEBMARAPRMAYJUNEJULYAUGSEPTOCTNOVDEC
201849.745.854.058.670.871.982.879.1NULLNULLNULLNULL
201743.746.651.657.367.072.178.381.573.861.151.345.6
201649.153.656.465.968.873.176.079.569.660.656.041.9
201550.354.557.959.968.078.982.679.068.563.649.447.1
Well, looks like there are good years and bad years. The year 2016 seems a rather energy-friendly year.

Pivoting in SQL

Let’s take a closer look at this query to understand how it works. First, we need to specify the FROM clause, which is the input of the pivot, in other words, the table or subquery based on which the pivoting will be performed. In our case, we are concerned about the years, the months, and the high temperatures, so those are the fields that appear in the sub-query.
Second, let’s consider another important part of the query, the PIVOT clause. The first argument of the PIVOT clause is an aggregate function and the column to be aggregated. We then specify the pivot column in the FOR sub-clause as the second argument, followed by the IN operator containing the pivot column values as the last argument.
The pivot column is the point around which the table will be rotated, and the pivot column values will be transposed into columns in the output table. The IN clause also allows you to specify an alias for each pivot value, making it easy to generate more meaningful column names.
An important idea about pivot is that it performs a grouped aggregation based on a list of implicit group-by columns together with the pivot column. The implicit group-by columns are columns from the FROM clause that do not appear in any aggregate function or as the pivot column.
In the above query, with the pivot column being the column month and the implicit group-by column being the column year, the expression avg(temp) will be aggregated on each distinct value pair of (year, month), where month equals to one of the specified pivot column values. As a result, each of these aggregated values will be mapped into its corresponding cell of row year and column month.
It is worth noting that because of this implicit group-by, we need to make sure that any column that we do not wish to be part of the pivot output should be left out from the FROM clause, otherwise the query would produce undesired results.

Specifying Multiple Aggregate Expressions

The above example shows only one aggregate expression being used in the PIVOT clause, while in fact, users can specify multiple aggregate expressions if needed. Again, with the weather data above, we can list the maximum high temperatures along with the average high temperatures between June and September.
SELECT * FROM (
  SELECT year(date) year, month(date) month, temp
  FROM high_temps
  WHERE date BETWEEN DATE '2015-01-01' AND DATE '2018-08-31'
)
PIVOT (
  CAST(avg(temp) AS DECIMAL(4, 1)) avg, max(temp) max
  FOR month in (6 JUN, 7 JUL, 8 AUG, 9 SEP)
)
ORDER BY year DESC
In case of multiple aggregate expressions, the columns will be the Cartesian product of the pivot column values and the aggregate expressions, with the names as <value>_<aggExpr>.
yearJUN_avgJUN_maxJUL_avgJUL_maxAUG_avgAUG_maxSEP_avgSEP_max
201871.98882.89479.194NULLNULL
201772.19678.38781.59473.890
201673.19376.08979.59569.678
201578.99282.69579.09268.581

Grouping Columns vs. Pivot Columns

Now suppose we want to include low temperatures in our exploration of temperature trends from this table of daily low temperatures:
DateTemp (°F)
08-01-201859
08-02-201858
08-03-201859
08-04-201858
08-05-201859
08-06-201859
To combine this table with the previous table of daily high temperatures, we could join these two tables on the “Date” column. However, since we are going to use pivot, which performs grouping on the dates, we can simply concatenate the two tables using UNION ALL. And you’ll see later, this approach also provides us with more flexibility:
SELECT date, temp, 'H' as flag
FROM high_temps
UNION ALL
SELECT date, temp, 'L' as flag
FROM low_temps
Now let’s try our pivot query with the new combined table:
SELECT * FROM (
  SELECT year(date) year, month(date) month, temp, flag `H/L`
  FROM (
    SELECT date, temp, 'H' as flag
    FROM high_temps
    UNION ALL
    SELECT date, temp, 'L' as flag
    FROM low_temps
  )
  WHERE date BETWEEN DATE '2015-01-01' AND DATE '2018-08-31'
)
PIVOT (
  CAST(avg(temp) AS DECIMAL(4, 1))
  FOR month in (6 JUN, 7 JUL, 8 AUG, 9 SEP)
)
ORDER BY year DESC, `H/L` ASC
As a result, we get the average high and average low for each month of the past 4 years in one table. Note that we need to include the column flag in the pivot query, otherwise the expression avg(temp) would be based on a mix of high and low temperatures.
yearH/LJUNJULAUGSEP
2018H71.982.879.1NULL
2018L53.458.558.5NULL
2017H72.178.381.573.8
2017L53.756.359.055.6
2016H73.176.079.569.9
2016L53.957.659.952.9
2015H78.982.679.068.5
2015L56.459.958.552.5
You might have noticed that now we have two rows for each year, one for the high temperatures and the other for low temperatures. That’s because we have included one more column, flag, in the pivot input, which in turn becomes another implicit grouping column in addition to the original column year.
Alternatively, instead of being a grouping column, the flag can also serve as a pivot column. So now we have two pivot columns, month and flag:
SELECT * FROM (
  SELECT year(date) year, month(date) month, temp, flag
  FROM (
    SELECT date, temp, 'H' as flag
    FROM high_temps
    UNION ALL
    SELECT date, temp, 'L' as flag
    FROM low_temps
  )
  WHERE date BETWEEN DATE '2015-01-01' AND DATE '2018-08-31'
)
PIVOT (
  CAST(avg(temp) AS DECIMAL(4, 1))
  FOR (month, flag) in (
    (6, 'H') JUN_hi, (6, 'L') JUN_lo,
    (7, 'H') JUL_hi, (7, 'L') JUL_lo,
    (8, 'H') AUG_hi, (8, 'L') AUG_lo,
    (9, 'H') SEP_hi, (9, 'L') SEP_lo
  )
)
ORDER BY year DESC
This query presents us with a different layout of the same data, with one row for each year, but two columns for each month.
yearJUN_hiJUN_loJUL_hiJUL_loAUG_hiAUG_loSEP_hiSEP_lo
201871.953.482.858.579.158.5NULLNULL
201772.153.778.356.381.559.073.855.6
201673.153.976.057.679.557.969.652.9
201578.956.482.659.979.058.568.552.5

What’s Next

To run the query examples used in this blog, please check the pivot SQL examples in this accompanying notebook.
Thanks to the Apache Spark community contributors for their contributions!
viernes, 21 de septiembre de 2018

ApexSQL Indentación y formato de sentencias SQL

Para ahorrarnos tiempo en el desarrollo de sentencias SQL, esta herramienta es muy buena

les dejo este articulo que encontre:
fuente: www.solutioncenter.apexsql.com


Indentación y formato de sentencias SQL
Hay pocas guías de formatos relacionadas a formatear SQL y estilos de código, pero no hay un estándar universalmente aceptado para SQL Server. En este artículo, sin embargo, seguiremos las guías implícitas de:

  • MSDN
  • Documentación de Libros en Pantalla de SQL Server 2012
  • Y la base de datos Adventure Works 2012 SQL Server
Veremos cómo podemos implementar estos estándares vía ApexSQL Refactor.
ApexSQL Refactor es un complemento gratis para SQL Server Management Studio and Visual Studio add-in and SQL Server Management Studio y Visual Studio y un formateador wSQL con cerca de 200 opciones de formato.
Use el terminador de sentencias
Estándar: Documentación de Libros en Pantalla de SQL Server 2012.
SQL Server requiere el punto y coma sólo en casos particulares:
  1. Para terminar la sentencia previa a una cláusula WITH definiendo una Expresión de Tabla Común (CTE, por sus siglas en inglés)
  2. Para terminar la sentencia previa a una sentencia de servicio SEND o RECEIVE
  3. Para terminar la sentencia MERGE
Por ejemplo, no usar punto y coma para terminar la sentencia MERGE resultará en un error:
Msg 10713, Level 15, State 1, Line 17
La documentación de Libros en Pantalla de SQL Server 2012 indica que no terminar sentencias T-SQL con un punto y coma es una característica deprecada, y que no será soportada en una versión futura de SQL Server.

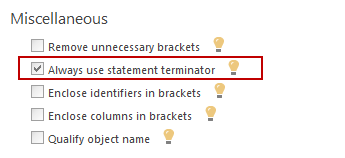
ApexSQL Refactor tiene una opción para estilos de código SQL, que añade el punto y coma al final de cada sentencia. Debajo del menú ApexSQL Refactor, en el diálogo Formatting options debajo de la pestaña General, seleccione la opción Always use statemente terminator:
Checking the Always use statement terminator option in ApexSQL Refactor
Esta opción terminará todas las sentencias con un punto y coma. Por ejemplo, el siguiente código:
CREATE FUNCTION [dbo].[ufnGetDocumentStatusText](@Status [tinyint])
RETURNS [nvarchar](16) 
AS 

BEGIN
    DECLARE @ret [nvarchar](16);

    SET @ret = 
        CASE @Status
            WHEN 1 THEN N'Pending approval'
            WHEN 2 THEN N'Approved'
            WHEN 3 THEN N'Obsolete'
            ELSE N'** Invalid **'
        END
    
    RETURN @ret
END
Será formateado con la terminación de sentencias:
CREATE FUNCTION [dbo].[ufnGetDocumentStatusText](
                           @Status [tinyint])
RETURNS [nvarchar](16)
AS
BEGIN
       DECLARE @ret [nvarchar](16);

       SET @ret = CASE @Status
          WHEN 1 THEN N'Pending approval'
   WHEN 2 THEN N'Approved'
   WHEN 3 THEN N'Obsolete'
   ELSE N'** Invalid **'
   END;

       RETURN @ret;
END;

Sangría
Estándar: Documentación de Libros en Pantalla de SQL Server 2012 y base de datos Adventure Works 2012.
Aquí usaremos 4 espacios para la sangría siguiendo la sangría de la base de datos Adventure Works 2012.
Hay tres clases estilos diferentes de sangría de código SQL en SSMS, y también se puede especificar cuántos espacios componen una sola sangría o tabulación.
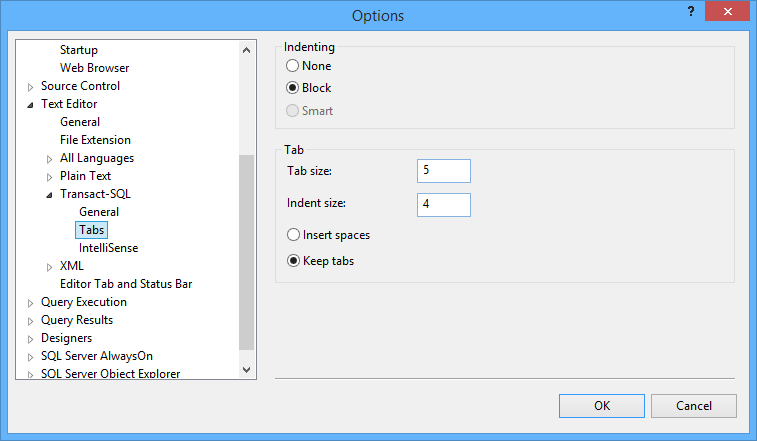
En SSMS, debajo del menú Tools, haga clic en Options. En la lista desplegable Text Editor elija Transact-SQL y Tabs:
How to format SQL like a pro - Indentation options in SSMS
Cuando la opción None está seleccionada, no se aplica la sangría a la nueva línea cuando se presiona ENTER.
Cuando la opción Block está seleccionada, se aplica automáticamente la sangría a la nueva línea creada al presionar ENTER, en la misma distancia de la línea previa. La opción Smart no está disponible para T-SQL.
La opción Tab size establece la distancia en espacios entre las paradas de tabulación. La opción Indent size establece el tamaño en espacios de una sangría automática.
La opción Insert spaces aplica sangría insertando sólo caracteres de espacio. Si el tamaño de la sangría es establecido a 4, entonces cuatro caracteres de espacio son insertados cuando la tecla TAB es presionada o se hace clic en el botón Increase Indent en la barra de herramientas en la ventana principal de SSMS.
Cuando la opción Keep tabs es seleccionada, la operación de sangría inserta para cada carácter tabulador el número de espacios especificado en Tab size.
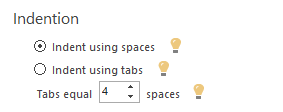
En ApexSQL Refactor hay muchas opciones de estilo de código SQL para sangría. Debajo la pestaña General podemos establecer la regla de sangría general, así como la sangría de paréntesis de apertura y cierre. Estableceremos la opción Indent using tabs igual a 4 espacios:
SQL coding style options for indentation in ApexSQL Refactor
Combinaciones
Estándar: Base de datos Adventure Works 2012
Un operador JOIN opera en tablas de dos entradas. Hay tres tipos fundamentales de combinaciones (joins en inglés) – combinaciones cruzadas, combinaciones internas y combinaciones externas. Cada tipo aplica a diferentes conjuntos de fases.
Una COMBINACIÓN CRUZADA aplica sólo a una fase – el Producto Cartesiano. Un producto Cartesiano es una operación matemática que retorna un conjunto de productos desde conjuntos múltiples. Para los conjuntos A y B, el producto Cartesiano A x B es un conjunto de todos los pares ordenados (a, b) donde a ∈ A y b ∈ B. Eso es, cada fila de una entrada es emparejada con todas las filas de la otra. Una tabla puede ser creada tomando el producto Cartesiano de un conjunto de filas y un conjunto de columnas.
A Cartesian product table
Una COMBINACIÓN INTERNA aplica dos fases lógicas de procesamiento de la consulta – un producto Cartesiano entre las tablas de dos entradas como en una combinación cruzada, y luego filtra las filas en base en el predicado especificado en la cláusula ON.
Una COMBINACIÓN EXTERNA aplica tres fases – las dos fases de procesamiento lógico que las combinaciones internas aplican (producto Cartesiano y el filtro ON) y una fase de Añadir Filas Externas. La tercera fase identifica las filas desde la tabla preservada que no encontraron coincidencias en la otra tabla basado en el predicado ON y añade esas filas a la tabla resultado producida por las dos primeras fases de la combinación, y usa marcas NULL para los atributos del lado no preservado de la combinación.
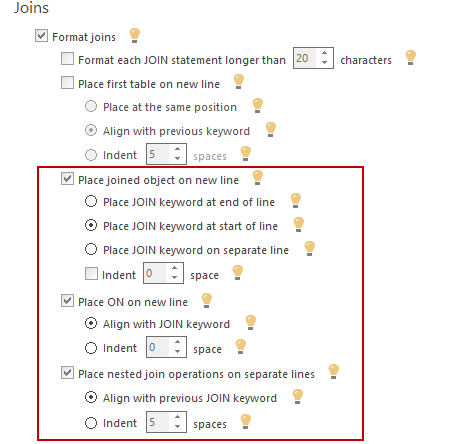
Para lograr formatear el estilo siguiendo la base de datos SQL Adventure Works 2012, debajo del menú ApexSQL Refactor, en el diálogo Formatting options debajo de la pestaña Joins elegiremos las siguientes opciones:
Joins options in ApexSQL Refactor used to achieve formatting style following AW 2012 SQL database
Esto formateará el siguiente código SQL:
 FROM [BOM_cte] cte INNER JOIN [Production].[BillOfMaterials] b 
ON b.[ProductAssemblyID]
= cte.[ComponentID]
      INNER JOIN [Production].[Product] p 
 ON b.[ComponentID] = p.[ProductID]

En código SQL justo como está en la base de datos Adventure Works 2012:
FROM [BOM_cte] AS cte
    INNER JOIN [Production].[BillOfMaterials] AS b
    ON b.[ProductAssemblyID] = cte.[ComponentID]
    INNER JOIN [Production].[Product] AS p
    ON b.[ComponentID] = p.[ProductID]

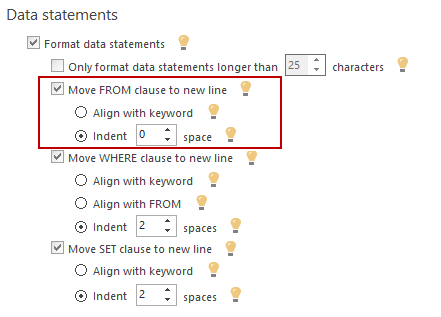
ApexSQL Refactor también tiene una opción para formatear la cláusula FROM. En el diálogo Formatting options, debajo de la pestaña Data statements elija la opción Move FROM clause to new line y establezca Indent a 0 espacios:
Move FROM clause to new line option in ApexSQL Refactor
Establecer esta opción ayudará adicionalmente a lograr formatear la base de datos Adventure Works 2012 y la siguiente declaración SQL:
CREATE PROCEDURE [dbo].[uspGetAddressInfo] @City nvarchar(30)
AS
BEGIN
SELECT * FROM AdventureWorks2012.Person.Address
WHERE City = @City
END
GO

Será formateada por el estándar de Adventure Works 2012:
CREATE PROCEDURE [dbo].[uspGetAddressInfo]
   @City nvarchar(30)
AS
BEGIN
       SELECT
       *
       FROM AdventureWorks2012.Person.Address
       WHERE City = @City;
END;

Elegiremos el mismo formato para la cláusula WHERE y formatearemos las sentencias SELECT anidadas.
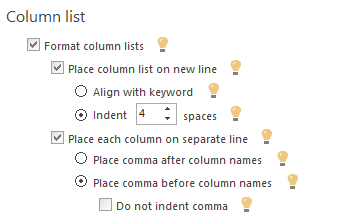
Las listas de columnas en la base de datos SQL Adventure Works 2012 están formateadas colocando una lista de columnas en una nueva línea, y poniendo una coma antes de los nombres de las columnas para facilitar la conexión del código. En el menú ApexSQL Refactor, bajo la pestaña Data statements también configuraremos las reglas de formato para la opción Column lists, la cual formateará la siguiente sentencia SQL:
CREATE VIEW [Purchasing].[vVendorWithContacts] AS 
SELECT  v.[BusinessEntityID],v.[Name],ct.[Name] AS [ContactType]  ,p.[Title] 
    ,p.[FirstName] 
    ,p.[MiddleName] 
    ,p.[LastName] ,p.[Suffix] 
    ,pp.[PhoneNumber],pnt.[Name] AS [PhoneNumberType]
    ,ea.[EmailAddress] ,p.[EmailPromotion] 

Setting the formatting rules for the Column lists option
De acuerdo con el estándar de la base de datos SQL Adventure Works 2012:
CREATE VIEW [Purchasing].[vVendorWithContacts] AS 
SELECT 
    v.[BusinessEntityID]
    ,v.[Name]
    ,ct.[Name] AS [ContactType] 
    ,p.[Title] 
    ,p.[FirstName] 
    ,p.[MiddleName] 
    ,p.[LastName] 
    ,p.[Suffix] 
    ,pp.[PhoneNumber] 
    ,pnt.[Name] AS [PhoneNumberType]
    ,ea.[EmailAddress] 
    ,p.[EmailPromotion] 

Alias
Estándar: Sitio MSDN y la base de datos Adventure Works 2012
La legibilidad de una sentencia SELECT puede ser mejorada dando a una tabla un alias. Un alias de tabla puede ser asignado con o sin la palabra reservada AS. En la sentencia FROM un alias puede ser usado para distinguir una tabla o una vista en una combinación a sí misma o una sub consulta y usualmente es un nombre de tabla acortado. Si el mismo nombre de columna existe en más de una tabla en una sentencia JOIN, SQL Server requiere que el nombre de la columna sea calificado por un nombre de tabla, un nombre de vista o alias. Si un alias es definido el nombre de la tabla no puede ser usado.
Por ejemplo, en el siguiente alias de código SQL para la fuente de la tabla de la StateProvince es sp:
CREATE VIEW [dbo].[vw_NewYork]
AS
SELECT p.LastName, p.FirstName, e.JobTitle, a.City, sp.StateProvinceCode
FROM HumanResources.Employee e
       INNER JOIN Person.Person p
       ON p.BusinessEntityID = e.BusinessEntityID
    INNER JOIN Person.BusinessEntityAddress bea 
    ON bea.BusinessEntityID = e.BusinessEntityID 
    INNER JOIN Person.Address a 
    ON a.AddressID = bea.AddressID
    INNER JOIN Person.StateProvince sp 
    ON sp.StateProvinceID = a.StateProvinceID
WHERE a.City = 'Seattle'
 
Si en lugar de un alias intentamos ejecutar el código SQL usando el nombre real de la tabla Person:
CREATE VIEW [dbo].[vw_Seattle]
AS
SELECT p.LastName, p.FirstName, e.JobTitle, a.City, sp.StateProvinceCode
FROM HumanResources.Employee e
       INNER JOIN Person.Person p
       ON p.BusinessEntityID = e.BusinessEntityID
    INNER JOIN Person.BusinessEntityAddress bea 
    ON bea.BusinessEntityID = e.BusinessEntityID 
    INNER JOIN Person.Address a 
    ON a.AddressID = bea.AddressID
    INNER JOIN Person.StateProvince sp 
    ON Person.StateProvinceID = a.StateProvinceID
WHERE a.City = 'Seattle'

 
La ejecución de la consulta SQL resultará en un error:
Msg 4104, Level 16, State 1, Procedure vw_Seattle, Line 12
The multi-part identifier “Person.StateProvinceID” could not be bound.
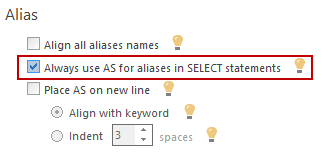
En ApexSQL Refactor, la opción Alias puede ser establecida bajo la pestaña Data statements:
In ApexSQL Refactor the Alias option can be set under the Data Statements tab
Y la sentencia SQL:
CREATE VIEW [Purchasing].[vVendorWithContacts]  
SELECT  v.[BusinessEntityID],v.[Name],ct.[Name]  [ContactType]  ,p.[Title] 
    ,p.[FirstName] 
    ,p.[MiddleName] 
    ,p.[LastName] ,p.[Suffix] 
    ,pp.[PhoneNumber],pnt.[Name]  [PhoneNumberType]
    ,ea.[EmailAddress] ,p.[EmailPromotion] 

Será formateada por el estándar Adventure Works 2012:
CREATE VIEW [Purchasing].[vVendorWithContacts]  
SELECT
       v.[BusinessEntityID]
  , v.[Name]
  , ct.[Name] AS [ContactType]
  , p.[Title]
  , p.[FirstName]
  , p.[MiddleName]
  , p.[LastName]
  , p.[Suffix]
  , pp.[PhoneNumber]
  , pnt.[Name] AS [PhoneNumberType]
  , ea.[EmailAddress]
  , p.[EmailPromotion]

Mayúsculas y minúsculas
Estándar: Sitio MSDN
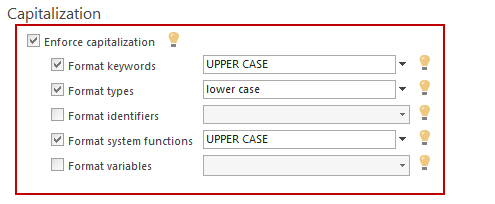
De acuerdo a las convenciones de sintaxis MSDN Transact-SQL, las MAYÚSCULAS deberían ser usadas para palabras reservadas de SQL y funciones incorporadas. Los tipos deberían estar en minúsculas:
Capitalization according to MSDN Transact-SQL syntax conventions
Dejaremos el formato de identificadores y variables como están, pero note que no es una buena práctica usar palabras reservadas como identificadores, y que la consistencia en el nombramiento de objetos SQL debería ser preservada usando ya sea Proper case o Camel case y siempre usando identificadores regulares, por ejemplo, ContactType en lugar de “Contact Type”.
Sentencias de esquemas
Estándar: Base de datos Adventure Works 2012
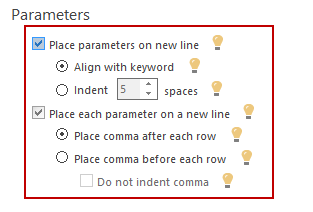
Siguiendo el estándar de formato de la base de datos SQL Adventure Works 2012 en la creación de procedimientos almacenados, bajo el menú ApexSQL Refactor, en el diálogo Formatting options bajo la pestaña Schema statements dé formato a la opción Parameters:
Adventure Works 2012 SQL database formatting standard in creating stored procedures
Usando esta opción lograremos el estilo de formato de la base de datos Adventure Works 2012 para parámetros de procedimientos almacenados desde este código SQL:
CREATE PROCEDURE [dbo].[uspGetWhereUsedProductID] @StartProductID [int],
@CheckDate
[datetime]
AS
BEGIN
A una sentencia SQL apropiadamente formateada:
CREATE PROCEDURE [dbo].[uspGetWhereUsedProductID]
       @StartProductID [int],
       @CheckDate [datetime]
AS
BEGIN
Expresiones
Estándar: Sitio MSDN y base de datos Adventure Works 2012
ApexSQL Refactor ofrece opciones de formato SQL para operaciones lógicas, de comparación y aritméticas.
Operadores lógicos – verifican la veracidad de una condición y retornan un tipo de dato Booleano con un valor de TRUE, FALSE o UNKNOWN.
Operadores aritméticos – usados para realizar operaciones matemáticas en múltiples expresiones y pueden ser usados con tipos de datos numéricos.
Operadores de comparación – verifican si dos expresiones son lo mismo y pueden ser usados con todas las expresiones excepto los tipos de datos text, ntext o image.
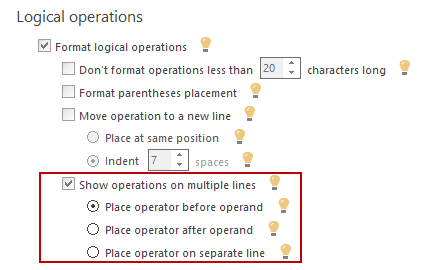
Bajo la pestaña Expressions en el diálogo Formatting options establezca la opción Logical operations en Show operations on multiple lines siguiendo el formato de la base de datos Adventure Works 2012:
ApexSQL Refactor's SQL formatting options for formatting logical, comparison and arithmetic operations
Esta opción dará formato al código SQL:
FROM [Production].[BillOfMaterials] b
            INNER JOIN [Production].[Product] p 
            ON b.[ProductAssemblyID] = p.[ProductID] 
        WHERE b.[ComponentID] = @StartProductID 
AND @CheckDate >= b.[StartDate] AND 
@CheckDate <= ISNULL(b.[EndDate], @CheckDate)
        UNION ALL
De acuerdo al estándar de la base de datos Adventure Works 2012:
FROM [Production].[BillOfMaterials] b
     INNER JOIN [Production].[Product] p 
     ON b.[ProductAssemblyID] = p.[ProductID] 
WHERE b.[ComponentID] = @StartProductID 
    AND @CheckDate >= b.[StartDate] 
    AND @CheckDate <= ISNULL(b.[EndDate], @CheckDate)
UNION ALL
Control de flujo
Estándar: Sitio MSDN
Indicar que una sentencia cubre más que una línea usando la combinación BEGIN/END hace al código más fácil de leer porque eso indica claramente el inicio y el final de la sentencia. Generalmente, las sentencias BEGIN/END son usadas en bucles WHILE, pero también son usados en procedimientos almacenados y sentencias IF según el estándar MSDN.
Para reforzar el envolvimiento de procedimientos almacenados con la combinación de las sentencias BEGIN/END en el diálogo Formatting options, bajo la pestaña Flow control seleccione las opciones Always use BEGIN and END in the IF statements y Always use BEGIN and END in stored procedures:
Always use BEGIN and END in stored procedures options found in ApexSQL Refactor
De esta manera todos los procedimientos almacenados serán formateados con la sentencia BEGIN/END, y escribir la sentencia CREATE PROCEDURE:
CREATE PROCEDURE [dbo].[uspGetAddressInfo] @City nvarchar(30)
AS
SELECT * FROM AdventureWorks2012.Person.Address
WHERE City = @City

GO

Envolverá la sentencia con las sentencias BEGIN/END:
CREATE PROCEDURE [dbo].[uspGetAddressInfo]
   @City nvarchar(30)
AS
BEGIN
       SELECT
       *
       FROM AdventureWorks2012.Person.Address
       WHERE City = @City;
END;

GO

Esto redondeará las opciones de formato. Para probar las configuraciones de formato formatearemos el siguiente código:
FROM Purchasing.Vendor v
INNER JOIN Person.BusinessEntityContact bec ON bec.BusinessEntityID 
= v.BusinessEntityID
INNER JOIN Person.ContactType ct ON ct.ContactTypeID = bec.ContactTypeID 
INNER JOIN Person.Person p
ON p.BusinessEntityID = bec.PersonID LEFT OUTER JOIN Person.EmailAddress ea
      ON ea.BusinessEntityID = p.BusinessEntityID
      LEFT OUTER JOIN Person.PersonPhone pp
      ON pp.BusinessEntityID = p.BusinessEntityID
      LEFT OUTER JOIN Person.PhoneNumberType pnt ON pnt.PhoneNumberTypeID 
= pp.PhoneNumberTypeID;

Nuestras configuraciones de formato nos darán el siguiente estilo de código:
   FROM Purchasing.Vendor AS v
       INNER JOIN Person.BusinessEntityContact AS bec
       ON bec.BusinessEntityID = v.BusinessEntityID
       INNER JOIN Person.ContactType AS ct
       ON ct.ContactTypeID = bec.ContactTypeID
       INNER JOIN Person.Person AS p
       ON p.BusinessEntityID = bec.PersonID
       LEFT OUTER JOIN Person.EmailAddress AS ea
       ON ea.BusinessEntityID = p.BusinessEntityID
       LEFT OUTER JOIN Person.PersonPhone AS pp
       ON pp.BusinessEntityID = p.BusinessEntityID
       LEFT OUTER JOIN Person.PhoneNumberType AS pnt
       ON pnt.PhoneNumberTypeID = pp.PhoneNumberTypeID;

aquí Para usar estas configuraciones simplemente extraiga el código XML descargado.
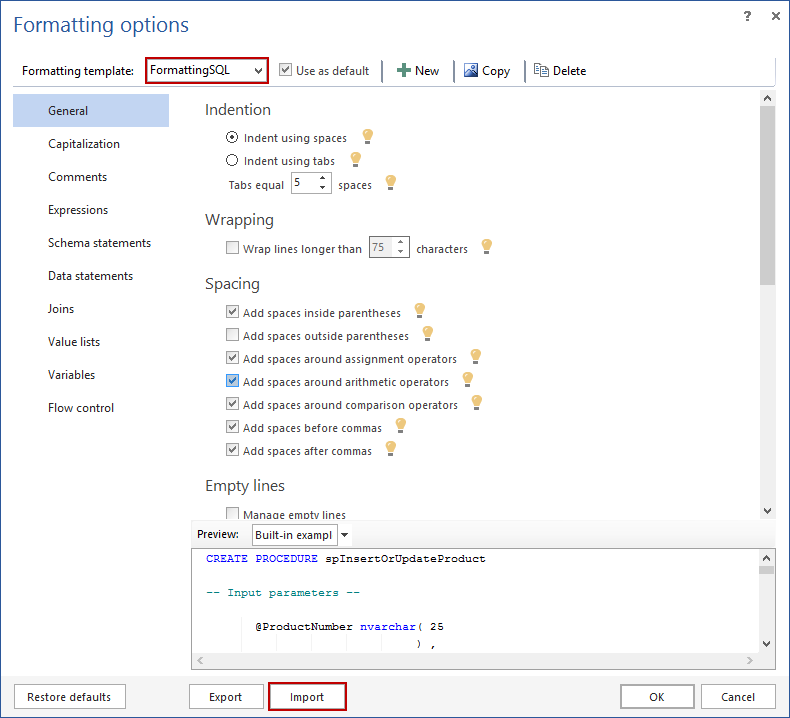
En el diálogo Formatting options de ApexSQL Refactor haga clic en el botón Import e importe la plantilla de estilo de código SQL a ApexSQL Refactor. En el menú desplegable Formatting template nombre la nueva plantilla y seleccione la opción Use as default:
Importing SQL coding style template to ApexSQL Refactor 


Tema oscuro en SQL Server Management Studio

******* ¡ACTUALIZACIÓN! *****

Ahora con la actualización de SSMS versión 21 ya viene predeterminado escoger el tema oscuro
Puedes descargar el SSMS desde este enlace: 
Instale SQL Server Management Studio | Microsoft Learn

Este ya trae la IA copilot incluida. 

******* ¡ACTUALIZACIÓN! *****

Les traigo este articulo que me pareció genial escrito por
 en la pagina de www.sqlshack.com

Lo encontré muy facil y sencillo de aplicar.

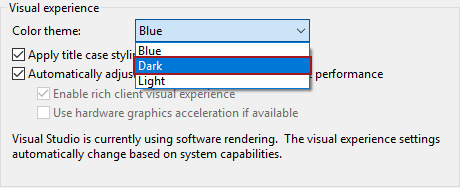
 En SSMS 2016, Microsoft introdujo la opción visual de elegir entre los colores de tema Azul y Claro. En SSMS 2016 el último SSMS 17, el usuario puede cambiar entre los temas Azul o Claro yendo a Tools > Options > Environment > General > Color theme:

Tema Oscuro de SSMS
Aunque no es oficialmente soportado por Microsoft, el tema Oscuro está también disponible en SSMS 2016 y el último SSMS 17. El tema ha sido muy popular entre administradores de bases de datos SQL y desarrolladores. Para habilitar el tema Oscuro en SSMS, siga estos simples pasos.
Cierre SSMS si está funcionando. Ejecute cualquier editor de texto como administrador, en este caso Notepad++ es usado para editar el archivo de configuración de SSMS:

El archivo de configuración (ssms.pkgundef) está en las siguientes localizaciones:
SSMS 2016
C:\Program Files (x86)\Microsoft SQL Server\130\Tools\Binn\ManagementStudio
SSMS 17
C:\Program Files (x86)\Microsoft SQL Server\140\Tools\Binn\ManagementStudio
Dependiendo de la versión de SSMS, localice y abra el archivo de configuración (ssms.pkgundef) en el editor de texto: 
***actualizacion***
Para la versión 18 de Management Studio el archivo se encuentra en : 
C:\Program Files (x86)\Microsoft SQL Server Management Studio 18\Common7\IDE

************** NUEVA ACTUALIZACIÓN 2023 **********************
para las versiones de SSMS versión 19 el archivo se encuentra en este path
C:\Program Files (x86)\Microsoft SQL Server Management Studio 19\Common7\IDE
************** NUEVA ACTUALIZACIÓN 2023 **********************


Una vez que el archivo es abierto en el editor de texto, desplácese y encuentre la sección del código debajo de la cabecera “Remove Dark Theme”, añada “//” (sin las comillas) antes de cada línea sólo para la parte “Remove Dark Theme”, y grabe el archivo:

Una vez completado, inicie SSMS y el color de tema Oscuro estará disponible en la caja de selección Color de SSMS:

Cada actualización de la última generación de SSMS restablecerá la configuración a la configuración inicial por defecto. Esto por supuesto sobrescribirá el cambio que hicimos anteriormente y la temática oscura no estará disponible entre las opciones.
En vez de realizar los mismos pasos para habilitar la temática oscura, gracias al lector (Luka Lovre) que hizo un script en PowerShell, existe una manera más sencilla para lograr el mismo objetivo que puede lograrse con unos pocos clics.
Todo lo que se necesita haces es ejecutar la línea de comandos CMD o el Windows PowerShell que es designado para mejorar la línea de comando y ejecutar scripts. En cualquier caso, asegúrese de ejecutar la línea de comandos como administrador. Caso contrario usted recibirá un mensaje de error con acceso denegado a la ruta:

En mi caso, utilizaré PowerShell porque en algunos casos aún cuando el script se ejecuta el script con éxito en el CMD, los cambios no se aplican (tal como en el caso de SSMS 17.7). Por lo tanto, en este ejemplo utilizaremos Windows PowerShell.
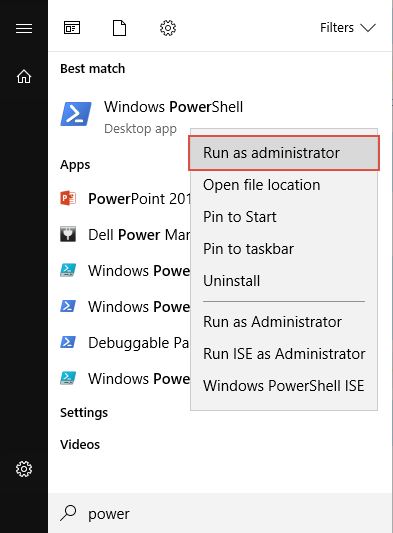
Para ejecutar PowerShell como administrador haga clic en Inicio, escriba PowerShell haga clic derecho en Windows PowerShell y escoja Ejecutar como administrador:

Dependiendo de la versión de SSMS, copie el script apropiado en la papelera y presione Intro para ejecutarlo:
SSMS 2016
SSMS 17

No recibirá un mensaje de respuesta de que la operación se realizó exitosamente. Solamente el cursor se moverá a una nueva línea.
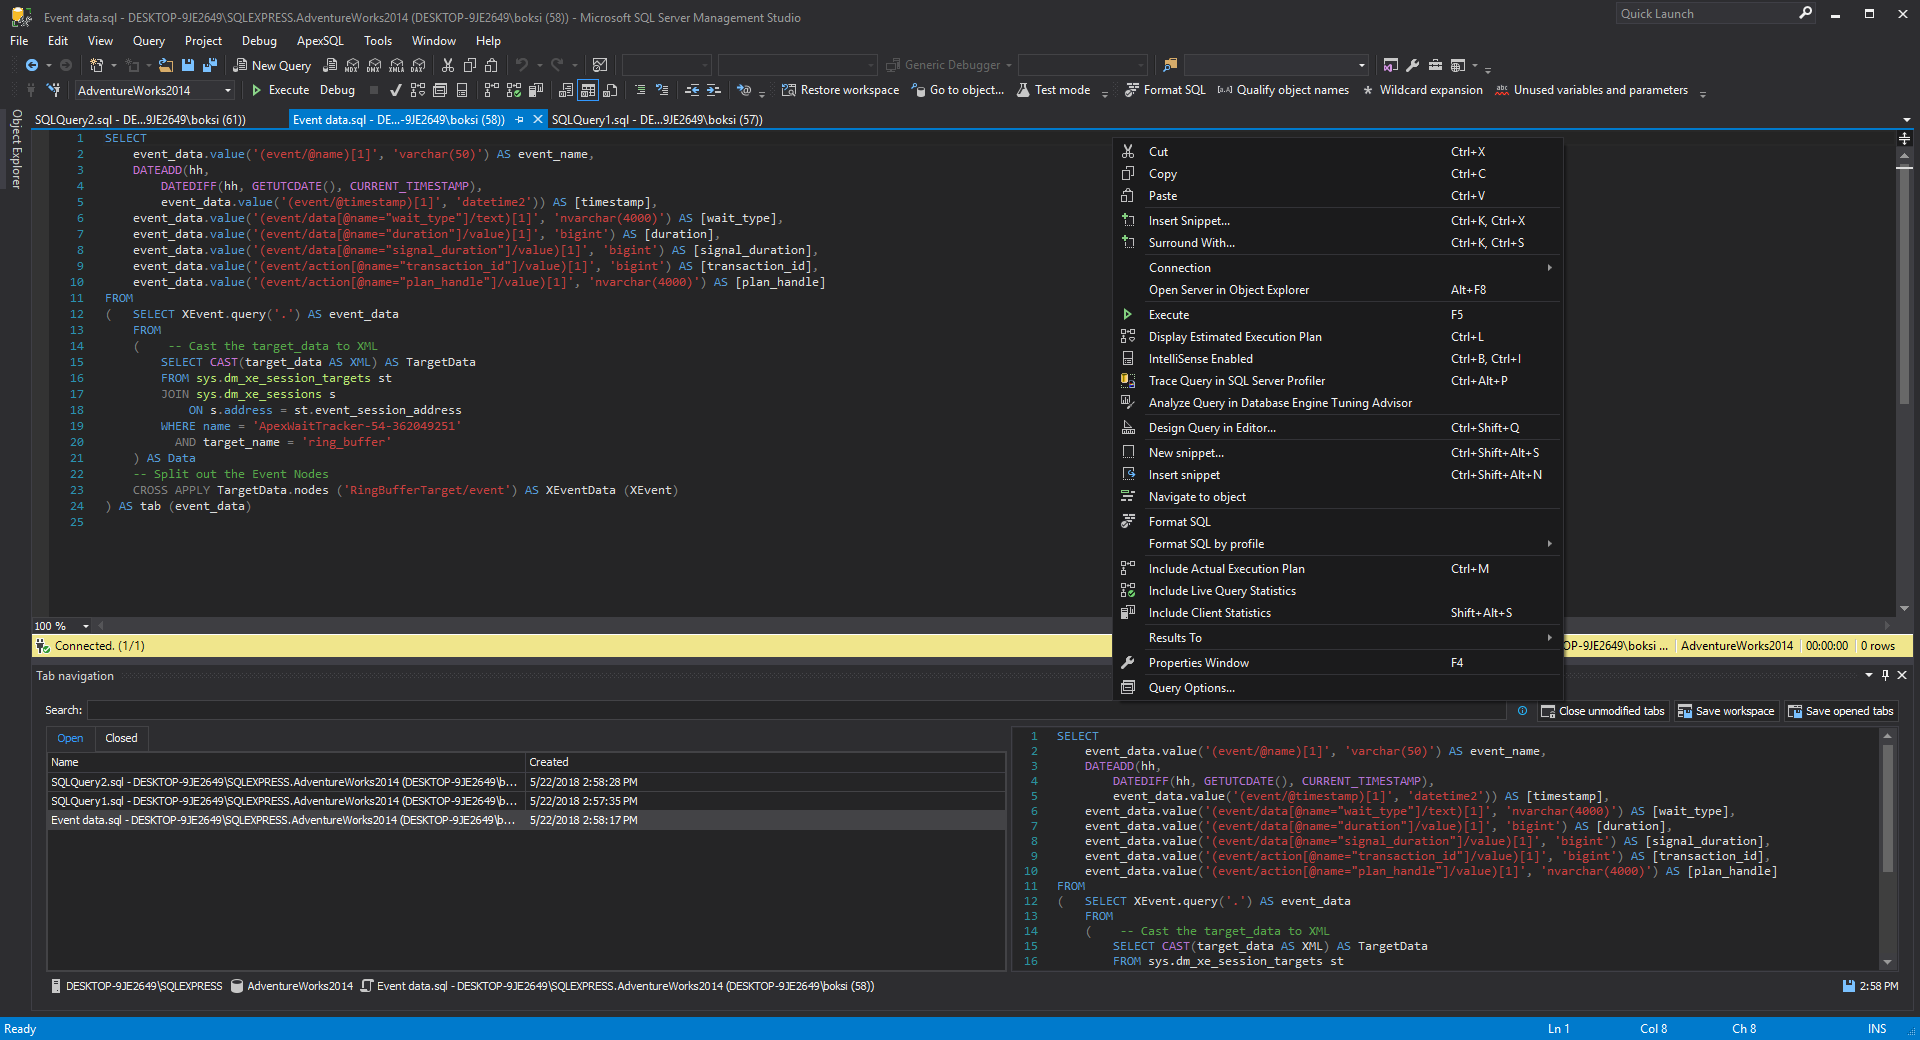
Una vez realizados cualquiera de estos dos métodos, inicie SSMS y cambie la apariencia de visual a oscuro. A continuación mostramos como se ve:

Nota: Como mencionamos anteriormente, el tema de color Oscuro en SSMS es aún un trabajo en progreso, y es por eso que está deshabilitado por defecto. Pueden haber algunas desviaciones visuales, por ejemplo, el fondo blanco en Object Explorer, la cuadrícula de Resultados, etc.


fuente: https://www.sqlshack.com/es/configurando-el-tema-oscuro-en-sql-server-management-studio/

jueves, 4 de mayo de 2017

SCRUM - Una muy buena herramienta


A medida que van creciendo los requerimientos de desarrollo, aumenta el poder asignar tareas, crear equipos, ver avances y responsables. A veces se hace tedioso si no contamos con una buena herramienta. Para dichos controles, existen varios metodos entre ellos el SCRUM, y existe, y que bueno a mi parecer, una pagina web que nos facilita esta tarea:

https://www.targetprocess.com

Esta página tiene la modalidad de que puedes accesar de forma gratuita y adicionar el equipo de trabajo.

Puedes determinar a un usario como Desarrollador y a otro como Ingeniero de Control de Calidad
es tan sencillo como arrastrar y soltar para indicar el avance de las tareas. En fin es una buena herramienta que incluso funciona con IOS y Android.


Muy recomendado.

este es el canal en youtube (ingles) para ver su funcionamiento:
https://www.youtube.com/user/TargetProcess


DeepSeek R1: La IA Multifacética que Todo Ingeniero de Software Debería Probar (¡Y es Gratis!)

  Introducción En el mundo de la ingeniería de software, las herramientas que nos ahorran tiempo y resuelven problemas complejos son oro pu...